Links

Showing posts with label HELPDESK. Show all posts

Tuesday, October 12, 2010

Windows Defender Error Code 0×800106ba in Windows 7 or Vista

Troubleshoot Windows Defender Error Code 0×800106ba
Formerly known as Microsoft Antispyware, the software giant released Windows Defender in 2006 to protect its number one operating system at the time, Windows XP, from spyware. Simple to use and supported in Windows Vista and 7, Windows Defender is well-known for its reliability and stability.
Unfortunately, Windows Defender does occasionally become corrupted and must be removed and reinstalled to work properly. The Windows Error Code 0×800106ba is usually accompanied with one of the following generic error messages:
Error Code 0×800106ba Application failed to initialize
Error Code 0×800106ba The systems license has expired. Your login request is denied
Whichever error you receive, there are two fixes you can try to get Windows Defender back up and running on your Windows XP, Vista, or 7 computer.
Before you try any of the fixes below, there is one caveat. Some third-party applications such as Norton AntiVirus don’t work well when Windows Defender is running. This is because these applications have their own antispyware application running. Having two applications that protect you from the same malware is inadvisable.
If your current malware protection software is already protecting you from spyware, you should permanently disable Windows Defender if the third-party application hasn’t done so already or if you or some other user of the computer restarted Windows Defender as a service that runs at Windows startup.

Manually Restart Windows Defender

Sometimes Windows Defender has trouble initializing at Windows startup. To manually start Windows Defender, begin by logging into Windows with an account that has administrative privileges. Click on Start>All Programs>Administrative Tools>Services.
You should now be looking at the Services window. In the right hand pane, locate the service titled Windows Defender. The services in the window are listed alphabetically so you will have no problem locating the Windows Defender service among the many services listed. Right click on Windows Defender and click on Properties.
Click the General tab and set the Startup type to Automatic (Delayed Start). This will instruct Windows to delay the startup of Windows Defender until other services and applications have finished loading.
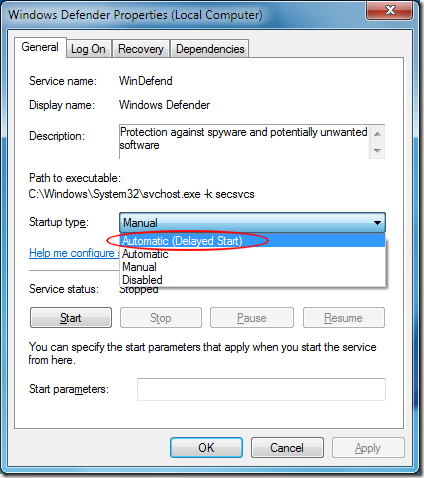
Click OK and restart your computer. If you still receive the 0×800106ba error message, you should try uninstalling and reinstalling Windows Defender.

Uninstall and Reinstall Windows Defender

To uninstall Windows Defender, click on Start and then Run. If you don’t have the Run command on your Start Menu, hold down the Windows key on your keyboard and press the R key. Either method brings up the Run dialog box. Type appwiz.cpl in the Run box and click OK.
Locate the Windows Defender entry in the list of applications and click the Uninstallbutton at the top of the list. Follow the instructions to complete the Windows Defender un-installation.
When finished, restart your computer and one again log in using an account that has administrative privileges. To reinstall Windows Defender, visit the official Windows Defender website, click on the Get It Now button, and follow the instructions.

Monday, October 11, 2010

Disable Automatic Reboot During System Crash

In Windows 7 and Windows XP, the default behavior of the operating system after a system crash or blue screen is to simply restart. Sometimes an automatic reboot can fix the problem and you don’t have to worry about the actual error.
However, most of the time once your system crashes or if you get a blue screen, it will not be a one time event. If there is some software or hardware problem with your computer, your system might crash often or you might get more BSOD’s.
In this case, it’s good to be able to actually see what the error message is that caused the crash. You can do this in two ways, either via the System properties or by editing the registry.

Windows 7, XP – Disable Automatic Reboot during Crash/Blue Screen

In Windows 7, you can turn off the automatic restart after a system crash by going to System properties. Right-click on My Computer and choose Properties. Note that the procedure for Windows XP is nearly identical.
Now click on Advanced System Settings on the left hand menu.
Click on the Advanced tab and then click on Settings under Startup and Recovery.
Finally, go ahead and uncheck the Automatically restart box under the System failureheading.
Click OK and close all the previous windows. Now when a system error or crash occurs, you will be able to see the entire message instead of it just flickering on the screen for half a second.

Disable Automatic Restart via Registry

Note that you can also disable this option via a registry key, so it could be scripted and run on many computers at once.
Navigate to the following registry key listed below:
HKEY_LOCAL_MACHINE\SYSTEM\CurrentControlSet\Control\CrashControl
Now find a key called AutoReboot. A value of 1 means that automatic restart is enabled and a value of 0 means it is disabled.
That’s pretty much it! This is a very useful feature that will give you a lot more time to review the error that caused a system crash or failure. If the error message flashes and then disappears, it’s because automatic restart is set. Enjoy!

Windows Hangs during Shutdown?

Does Windows hang when you try to shut it down? On one of my laptops, I ran into the problem where Windows would just hang while saying
Windows is Shutting Down
Sometimes it would eventually shut down, but it could take anywhere from 4 minutes to 10! The laptop is brand new and was running Windows 7, so there were no problems with the specs.
After playing around with several solutions, I was able to get rid of the annoying shutdown problem! In this post, I’ll go through the various solutions I tried and hopefully one will work for you.

Method 1 – Reinstall Network Drivers

For some strange reason, network drivers can really cause a lot of problems during shutdown. Windows tries to send certain commands to your network card to kill off network connections and if there is any problem with that communication, you can experience a very long shutdown period.
Go ahead and download the latest network drivers and install them. Restart your computer (might have to kill the power the first time) and see if it still hangs during shutdown.

Method 2 – Remove Hardware

Another reason why a shutdown can take forever is if there is some new hardware that has been installed on the computer.
If you recently installed any hardware, disable it in Device Manager and see if that solves your problem. If so, you might have to update the drivers for that piece of hardware. Also, make sure to disconnect any USB device from your computer such as USB sticks and external hard drives.

Method 3 – Uninstall Software

Another way to fix this issue is to open Task Manager and kill off some processes and then try to restart. If it’s a software program running in the background that is causing the issue, the computer will shutdown immediately.
I noticed this was a problem on computers that had anti-virus and battery backup (UPS) software installed at the same time. The two would conflict with each other during shutdown and prevent the computer from turning off.
You can try disabling anti-virus program or security software first as these tend to hang and cause issues during shutdown.
You can also disable programs from starting up altogether by going to Startup in MSCONFIG. Disable as many services (other than Microsoft ones) and startup programs as possible and try to shutdown.
Note that the slow shutdown can also be caused by Windows services like Terminal Services or graphics card services. You can disable services by using MSCONFIG or by typing services.msc into CMD.

Method 4 – Paging File Setting

Some users could have a problem in which the page file is set to be cleared during every shutdown of the computer. This is sometimes done for security reasons, but most users would never need this feature.
It can, however, be turned on by certain security software. You can disable it by going to Start, Run, typing GPEDIT.MSC and clicking ok.
Then go to Computer Configuration, Windows Settings, Security Settings, Local Policies, Security Options and find Shutdown: Clear virtual memory pagefile. Make sure it is disabled.

Method 4 – Logoff Scripts

If you are in a domain environment, a slow shutdown could be caused by logoff scripts that are enforced on your PC. And it could actually be a problem when you are not connected to your office network.
In these cases, the computer is searching for the corporate network, but can’t find the logoff scripts and then times out after a certain amount of time. You can ask your network administrator if you think that is the reason for your slow shutdown.
If you’re still having shutdown problems in Windows 7, Vista, or XP, post a comment here with specific details and we will try to help!

Sunday, October 10, 2010

Free Microsoft Word password / Microsoft Excel password recovery software

Forgotten your Microsoft Word password or Microsoft Excel password and can't open your file? Try Free Word / Excel Password Recovery Wizard before spending any money on commercial software.


Free Word / Excel Password Recovery Wizard offers the same functionality and performance as expensive commercial Word password / Excel password software, but is a completely free download.  Unlike other supposedly "free" downloads, it is a full product, not a demo version or shareware. It contains no spyware or other malware.


Download Free Word / Excel Password Recovery wizard
Welcome to the downloads page. You can get the latest version of the Free Word / Excel Password Recovery Wizard from this page, as well as download required Windows components that you may not have.
This software is freeware, not a trial version or shareware. This is the full version of the software.
Downloading and use of the Free Word / Excel password recovery wizard is subject to the license agreement (which can be viewed here).
Download Free Word / Excel password recovery wizard now (237KB)
This product requires you to have the Windows installer and .NET framework installed on your PC. If you are running Windows XP, this will probably already have everything you need, if not, you may need to download the following components.
Download Windows installer (InstMsiA.exe) - not required for Windows 2000 or later (1668KB)
Download Windows installer (InstMsiW.exe) - not required for Windows 2000 or later (1779KB)
Download the Windows .NET framework - only required if not already installed
To install this software, extract all the files from the WinZip archive to your hard drive, then double click on the file called FreeWordExcelPasswordWizard.msi (204Kb). Don't double click on the Setup.exe file as this is used by the installer, and will simply display an error message (in Italian).
A standard English dictionary is bundled with the installation and is installed in the program directory (by default C:\Program Files\www.freewordexcelpassword.com\Free Word Excel Password Wizard\dictionary.txt). A larger commercial dictionary is available here.


Screenshots
Here are some screenshots showing the program.  You can see how easy Free Word / Excel Password Recovery is to use, with helpful instructions on each page that guide you through the password recovery.


Friday, September 24, 2010

Upgrading Java version (JDK) in Solaris

I'm going to show you how to up-grade your java version in Solaris 10..
First of all, check your current version

root@u10 # java -version
java version "1.5.0_07"
Java(TM) 2 Runtime Environment, Standard Edition (build 1.5.0_07-b03)
Java HotSpot(TM) Client VM (build 1.5.0_07-b03, mixed mode, sharing)
root@u10 #
Here, we can see that the java version in my box is 1.5.0_07

We want to up-grade the latest version. You can get the latest version from here. In this tutorial, I'm going to up-grade the java into 6update3. The file named jdk-6u3-solaris-sparc.tar.Z


Unzip the file in any folder (/tmp for example)

root@u10 # gunzip jdk-6u3-solaris-sparc.tar.Z
It will create the gunzip jdk-6u3-solaris-sparc.tar
Untar the file

root@u10 # tar xvf jdk-6u3-solaris-sparc.tar
The result :

root@u10 # ls
COPYRIGHT SUNWj6rt
LICENSE SUNWjavadb-client
README.html SUNWjavadb-common
SUNWj6cfg SUNWjavadb-core
SUNWj6dev SUNWjavadb-demo
SUNWj6dmo SUNWjavadb-docs
SUNWj6jmp SUNWjavadb-javadoc
SUNWj6man

Add the package

root@u10 # pkgadd -d /tmp

Solaris will perform the package installation. Just follow all the steps.
After that check the /usr/jdk folder

root@u10 # cd /usr/jdk
root@u10 # lsinstances jdk1.5.0_07 latest
j2sdk1.4.2_12 jdk1.6.0_03 packages

You'll see the new folder named jdk1.6.0_03. That's the new folder Solaris made after the pkgadd command.
In Solaris, java reside in /usr/java
Change your directory to /usr

root@u10 # cd /usr
root@u10 # ls -ltr java
lrwxrwxrwx 1 root other 15 Sep 12 21:48 java -> jdk/jdk1.5.0_07

As you can see, /usr/java is a link to /usr/jdk/jdk1.5.0_07 folder. Remember the current version of java.. That's right, 1.5.0_07 is the current version.
Next step is, change the link destination to /usr/jdk/jdk1.6.0_03

root@u10 # rm java (remove the current link)
root@u10 # ln -s jdk/jdk1.5.0_03 java (create new link)
root@u10 # ls -ltr java
lrwxrwxrwx 1 root root 15 Nov 28 22:35 java -> jdk/jdk1.6.0_03

The link has been created.
And the step, check your current java version

root@u10 # java -version
java version "1.6.0_03"
Java(TM) SE Runtime Environment (build 1.6.0_03-b05)
Java HotSpot(TM) Client VM (build 1.6.0_03-b05, mixed mode, sharing)

Sunday, September 12, 2010

DoS prog for IT HelpDesk Cleanup Utility

In This Section we will create a DOS batch file for cleaning up Windows PC temporary files, to run check Disk & De-fragment utility.

This script is made to easy the job of desktop Engineers.

Follow the steps explained below:
  • First Create a text file with name IT_HelpDesk_Cleanup_Utility
  • Copy paste below script content to the file.
+++++++++++++++++++++++Script Starts Here+++++++++++++++++++++++++
@echo off
cls
echo ---------------------------------------------------------
echo ---- ****** **** IT HelpDesk Cleanup Utility ----
echo ---- ----
echo ---- Contact Information: ithelpdesk@**********.com ----
echo ---- ----
echo ---- Ph: ***-***-*** ----
echo ---------------------------------------------------------
pause
cls
:::::::::::::::::::::::::::::::::::::::::::::::::::::::::
:::::::::::::::::::::::::::::::::::::::::::::::::::::::::
:::::::::::::::::::::::::::::::::::::::::::::::::::::::::
:: The next lines wipe out the temp directories in standard locations
:::::::::::::::::::::::::::::::::::::::::::::::::::::::::
:::::::::::::::::::::::::::::::::::::::::::::::::::::::::
:::::::::::::::::::::::::::::::::::::::::::::::::::::::::
del /s /q /f %TEMP%
del /s /q /f "c:\temp\*"
del /s /q /f "C:\RECYCLER\*"
del /s /q /f "D:\RECYCLER\*"
del /s /q /f "C:\Windows\Prefetch\*"
del /s /q /f "C:\Windows\Temp\*"
del /s /q /f "%UserProfile%\Local Settings\Temp\*"
del /s /q /f "%UserProfile%\Local Settings\Temporary Internet Files\*"
del /s /q /f "C:\WINDOWS\Downloaded Installations\*
del /s /q /f "C: WINDOWS\SoftwareDistribution\Download\*
del /s /q /f "C:\Windows\pchealth\helpctr\Datacoll\*"
del /s /q /f "C:\winnt\Recent\*
del /s /q /f "c:\*.chk"
PUSHD C:\RECYCLER
IF /I "%CD%"=="C:\RECYCLER" RD /S /Q "C:\RECYCLER" 2>NUL
POPD
:::::::::::::::::::::::::::::::::::::::::::::::::::::::::::::::::::::::::
PUSHD D:\RECYCLER
IF /I "%CD%"=="D:\RECYCLER" RD /S /Q "D:\RECYCLER" 2>NUL
POPD
:::::::::::::::::::::::::::::::::::::::::::::::::::::::::::::::::::::::::
echo ---------------------------------------------------------
echo --------This Process may take up to 45 Min to an Hour----
echo ---------------------------------------------------------
pause
cls
echo Y|chkdsk C: /F
echo Y|chkdsk D: /F
echo ---------------------------------------------------------
cleanmgr.exe /sagerun:99
echo ---------------------------------------------------------
defrag C: -f
defrag D: -f
+++++++++++++++++++++++Script Ends Here+++++++++++++++++++++++++
  • Edit Email id "ithelpdesk@**********.com" & Phone number "Ph: ***-***-***" in script
  • Save Script as dos batch file with name IT_HelpDesk_Cleanup_Utility.bat
  • If you need ready made script click here to download
  • Note extension of file here is .bat which is dos batch file extension.
  • copy this file to your USB flash drive & you are ready just double click the file & it will do the cleanup job for you

Tuesday, September 7, 2010

130 keyboard shortcuts


Shortcut Keys for common use

1
CTRL+C
Copy
2
CTRL+X
Cut
3
CTRL+V
Paste
4
CTRL+Z
Undo
5
DELETE
Delete
6
SHIFT+DELETE
Delete the selected item permanently without placing the item in the Recycle Bin
7
CTRL while dragging an item
Copy the selected item
8
CTRL+SHIFT while dragging an item
Create a shortcut to the selected item
9
F2 key
Rename the selected item
10
CTRL+RIGHT ARROW
Move the insertion point to the beginning of the next word
11
CTRL+LEFT ARROW
Move the insertion point to the beginning of the previous word
12
CTRL+DOWN ARROW
Move the insertion point to the beginning of the next paragraph
13
CTRL+UP ARROW
Move the insertion point to the beginning of the previous paragraph
14
CTRL+SHIFT with any of the arrow keys
Highlight a block of text
15
SHIFT with any of the arrow keys
Select more than one item in a window or on the desktop, or select text in a document
16
CTRL+A
Select all
17
F3 key
Search for a file or a folder
18
ALT+ENTER
View the properties for the selected item
19
ALT+F4
Close the active item, or quit the active program
20
ALT+ENTER
Display the properties of the selected object
21
ALT+SPACEBAR
Open the shortcut menu for the active window
22
CTRL+F4
Close the active document in programs that enable you to have multiple documents open simultaneously
23
ALT+TAB
Switch between the open items
24
ALT+ESC
Cycle through items in the order that they had been opened
25
F6 key
Cycle through the screen elements in a window or on the desktop
26
F4 key
Display the Address bar list in My Computer or Windows Explorer
27
SHIFT+F10
Display the shortcut menu for the selected item
28
ALT+SPACEBAR
Display the System menu for the active window
29
CTRL+ESC
Display the Start menu
30
ALT+Underlined letter in a menu name
Display the corresponding menu
31
Underlined letter in a command name on an open menu
Perform the corresponding command
32
F10 key
Activate the menu bar in the active program
33
RIGHT ARROW
Open the next menu to the right, or open a submenu
34
LEFT ARROW
Open the next menu to the left, or close a submenu
35
F5 key
Update the active window
36
BACKSPACE
View the folder one level up in My Computer or Windows Explorer
37
ESC
Cancel the current task
38
SHIFT when you insert a CD-ROM into the CD-ROM drive
Prevent the CD-ROM from automatically playing
39
Dialog Box Keyboard Shortcuts 

40
CTRL+TAB
Move forward through the tabs
41
CTRL+SHIFT+TAB
Move backward through the tabs
42
TAB
Move forward through the options
43
SHIFT+TAB
Move backward through the options
44
ALT+Underlined letter
Perform the corresponding command or select the corresponding option
45
ENTER
Perform the command for the active option or button
46
SPACEBAR
Select or clear the check box if the active option is a check box
47
Arrow keys
Select a button if the active option is a group of option buttons
48
F1 key
Display Help
49
F4 key
Display the items in the active list
50
BACKSPACE
Open a folder one level up if a folder is selected in the Save As or Open dialog box

m*cro$oft Natural Keyboard Shortcuts 

51
Windows Logo
Display or hide the Start menu
52
Windows Logo+BREAK
Display the System Properties dialog box
53
Windows Logo+D
Display the desktop
54
Windows Logo+M
Minimize all of the windows
55
Windows Logo+SHIFT+M
Restore the minimized windows
56
Windows Logo+E
Open My Computer
57
Windows Logo+F
Search for a file or a folder
58
CTRL+Windows Logo+F
Search for computers
59
Windows Logo+F1
Display Windows Help
60
Windows Logo+ L
Lock the keyboard
61
Windows Logo+R
Open the Run dialog box
62
Windows Logo+U
Open Utility Manager


Accessibility Keyboard Shortcuts 

63
Right SHIFT for eight seconds
Switch FilterKeys either on or off
64
Left ALT+left SHIFT+PRINT SCREEN
Switch High Contrast either on or off
65
Left ALT+left SHIFT+NUM LOCK
Switch the MouseKeys either on or off
66
SHIFT five times
Switch the StickyKeys either on or off
67
NUM LOCK for five seconds
Switch the ToggleKeys either on or off
68
Windows Logo +U
Open Utility Manager
69
Windows Explorer Keyboard Shortcuts 

70
END
Display the bottom of the active window
71
HOME
Display the top of the active window
72
NUM LOCK+Asterisk sign (*)
Display all of the subfolders that are under the selected folder
73
NUM LOCK+Plus sign (+)
Display the contents of the selected folder
74
NUM LOCK+Minus sign (-)
Collapse the selected folder
75
LEFT ARROW
Collapse the current selection if it is expanded, or select the parent folder
76
RIGHT ARROW
Display the current selection if it is collapsed, or select the first subfolder


Shortcut Keys for Character Map 


After you double-click a character on the grid of characters, you can move through the grid by using the keyboard shortcuts: 

77
RIGHT ARROW
Move to the right or to the beginning of the next line
78
LEFT ARROW
Move to the left or to the end of the previous line
79
UP ARROW
Move up one row
80
DOWN ARROW
Move down one row
81
PAGE UP
Move up one screen at a time
82
PAGE DOWN
Move down one screen at a time
83
HOME
Move to the beginning of the line
84
END
Move to the end of the line
85
CTRL+HOME
Move to the first character
86
CTRL+END
Move to the last character
87
SPACEBAR
Switch between Enlarged and Normal mode when a character is selected
88
m*cro$oft Management Console
MMC
89
CTRL+O
Open a saved console
90
CTRL+N
Open a new console
91
CTRL+S
Save the open console
92
CTRL+M
Add or remove a console item
93
CTRL+W
Open a new window
94
F5 key
Update the content of all console windows
95
ALT+SPACEBAR
Display the MMC window menu
96
ALT+F4
Close the console
97
ALT+A
Display the Action menu
98
ALT+V
Display the View menu
99
ALT+F
Display the File menu
100
ALT+O
Display the Favorites menu
MMC Console Window Keyboard Shortcuts 

101
CTRL+P
Print the current page or active pane
102
ALT+Minus sign (-)
Display the window menu for the active console window
103
SHIFT+F10
Display the Action shortcut menu for the selected item
104
F1 key
Open the Help topic, if any, for the selected item
105
F5 key
Update the content of all console windows
106
CTRL+F10
Maximize the active console window
107
CTRL+F5
Restore the active console window
108
ALT+ENTER
Display the Properties dialog box, if any, for the selected item
109
F2 key
Rename the selected item
110
CTRL+F4
Close the active console window. When a console has only one console window, this shortcut closes the console


Remote Desktop Connection Navigation 

111
CTRL+ALT+END
Open the m*cro$oft Windows NT Security dialog box
112
ALT+PAGE UP
Switch between programs from left to right
113
ALT+PAGE DOWN
Switch between programs from right to left
114
ALT+INSERT
Cycle through the programs in most recently used order
115
ALT+HOME
Display the Start menu
116
CTRL+ALT+BREAK
Switch the client computer between a window and a full screen
117
ALT+DELETE
Display the Windows menu
118
CTRL+ALT+Minus sign (-)
Place a snapshot of the active window in the client on the Terminal server clipboard and provide the same functionality as pressing PRINT SCREEN on a local computer.
119
CTRL+ALT+Plus sign (+)
Place a snapshot of the entire client window area on the Terminal server clipboard and provide the same functionality as pressing ALT+PRINT SCREEN on a local computer.

microsoft Internet Explorer Navigation 

120
CTRL+B
Open the Organize Favorites dialog box
121
CTRL+E
Open the Search bar
122
CTRL+F
Start the Find utility
123
CTRL+H
Open the History bar
124
CTRL+I
Open the Favorites bar
125
CTRL+L
Open the Open dialog box
126
CTRL+N
Start another instance of the browser with the same Web address
127
CTRL+O
Open the Open dialog box, the same as CTRL+L
128
CTRL+P
Open the Print dialog box
129
CTRL+R
Update the current Web page
130
CTRL+W
Close the current window 


Search This Blog