Links

Saturday, February 26, 2011

Opera 11.10 Barracuda adds infinite Speed Dial


If you guessed the unnamed-but-very-popular feature Opera was planning to overhaul in Opera 11.10 was the Speed Dial, buy yourself a beer! The browser's trademark new tab page has indeed been retooled. In the latest Opera 11.10 snapshot build, there's no limit to the number of Speed Dial entires you can add. Gone are the blank placeholder boxes from previous Opera versions, replaced with only active Speed Dial entries and an add button.


Opera has temporarily disabled Speed Dial sync in this build, and there are a handful of other known issues listed on the official blog post.


As for this being the 'big secret' planned for the Opera 11.10 release -- Opera's Thomas Ford tells us 'That's not the only improvement we have lined up for Opera 11.10, though. Speed Dial is just the first to get an overhaul.'


Download Opera 11.10 build 2104 for Windows / Mac / Linux/FreeBSD

Monday, February 21, 2011

Lower your Amazon S3 Bill and also Improve Website Loading Time


This is a money-saving tip for web publishers who use Amazon S3 for hosting images and other static content like CSS, JavaScript files, etc.
Since Amazon S3 is a "pay as you use" storage service, your S3 bill is always directly proportional to the bandwidth that your sites consume.

How Browsers Interact with Amazon S3

When a visitor comes to your site the first time, the static images are downloaded from Amazon S3 servers and get saved inside his browser's cache.
Now if that same person visits your site again sometime in future, his browser will make another GET request to Amazon S3 asking for a fresh copy of the web images.
Since the images stored on Amazon S3 haven't changed since his last visit, Amazon servers will return a 304 Not Modified header response indicating that there's no need to download images again.
So far so good. That 304 response prevented the visitor's browser from downloading the same data again (thus saving you money) but there's another problem – Amazon S3 also charges you for every GET request so each time a browser asks Amazon if images have changed since last visit, that question itself adds to your bill even if the answer is "no".

How to Reduce Your Amazon S3 Bill

While the cost for GET requests is small (just 1¢ per 10,000 requests), they can quickly add-up if you have have a popular site or if your website design uses too many images. For instance, every page on http://atoz-networking.blogspot.com/ has about 25 static images served from S3.
To control this cost, you need a mechanism that will prevent browsers from sending the GET request if the file already exists in their cache. This can be easily done by setting appropriate Cache-Control and Expires headers at the time of uploading the files on to Amazon S3.
Cache-Control is like instructing the browser whether to make any requests to Amazon S3 or not before a given period. So if you set Cache-Control max-age=864000 for your S3 images, the web browsers will not request that file from S3 storage until the next 10 days (3600*24*10 sec).
Other than saving money, your site will also load relatively faster because the visitor's browser will reuse images, logos and other static files from the cache without making any new request to Amazon S3.
BitRhymes, developers of the popular Sketch Me app for MySpace, saw their Amazon S3 billdip by 40% after they implemented cached headers for images.

Implement Caching for Amazon S3 Files

To set the appropriate Cache-Control headers for files hosted on Amazon S3, you can either use the Bucket Explorer client (cost $50) or upload files manually via this PHP scriptwritten by Lalit Patel who is also the inspiration behind this article.
If you are worried about setting Cache headers for JavaScript and CSS files as they may change frequently (especially when you are in the midst of a site re-design), Lalit shares a very simple workaround – just append a version number after the file name like main.js?v=2&tag=labnol-20.
Before: <link href="http://files.labnol.org/main.css?v=2" ../>
After:  <link href="http://files.labnol.org/main.css?v=3" ../>
Change the version from 2 to 3 and visitors browser will make a fresh GET request to Amazon S3 for the latest version of the S3 file.

[Tutorial] Host Your Website on Amazon S3


Most web hosting companies charge you a fixed monthly fee and in return, they offer you a finite amount of storage space for hosting your web pages, images and other files.

It doesn’t really matter if you are hosting a simple website with 10 pages or a comprehensive product catalogue with thousands of pages – the amount you pay for hosting will be the same.

There’s also a limit on the amount of traffic (bandwidth quota) that your site can receive in a month. If you exceed that limit, the hosting provider is likely to suspend your site or you’ll be asked to upgrade to a different plan. On the other side, if your site receives only minimal traffic, you’ll still have to pay for the full bandwidth.

Amazon S3 vs Regular Web Hosting


Unlike web hosting companies, Amazon S3 follows a ‘pay for what you use’ model where you only have to pay for the exact amount of storage and bandwidth that your website is consuming in a month.

There’s another advantage - the Amazon S3 SLA guarantees a monthly uptime of at least 99.9% which, I doubt, is offered by any of the traditional web hosting companies.

And thanks to some recent enhancementshosting your website on Amazon S3 is almost as easy as uploading your files to an FTP server. The only limitation is that Amazon S3 can only be used for hosting HTML websites and not dynamic sites like WordPress blogs.

How to host websites with Amazon S3


Step 1: Assuming that you already an Amazon.com account, log in to your Amazon S3 console. You may also use desktop-based S3 clients but to keep things simple, we’ll use the web client in this tutorial.

Step 2: Create a bucket here and give it a name which is the same as your website. For instance, if you are planning to host your website mybeautifulfamily.com with Amazon, create an S3 bucket with same name.

Step 3: Select the new bucket and click the Upload button to upload all the web pages, images, CSS and other static files from your desktop to your Amazon S3 bucket. Click ‘Set Permissions,’ select ‘Make Everything Public’ and start the upload process.

Step 4: Now that your files have been uploaded, right-click the bucket name and choose Properties. Switch to the Websites tab, enable the websites feature and set your index.html file as the index document. Save the changes.

That’s it. Here's a recap of all the above steps in the form of a video screencast:


Map Amazon S3 to your own Web Domain

There’s one last step. Your website is now hosted on Amazon S3 but it has a confusing web address (akaEndpoint) which looks something like this:

mybeautifulfamily.com.s3-website-us-east-1.amazonaws.com

Since we want people to find our site at mybeautifulfamily.com and not through the above address, we need to map the Amazon bucket address to our sweet web domain.

That’s also simple – log in to your domain hosting service and create a new CNAME Record for your domain. Set the value of this CNAME record as the Endpoint provided by Amazon S3 and save your changes. The DNS changes might take a while to propagate across the web and once that happens, your new site can be accessed from anywhere.

The Cost of Hosting Websites with Amazon S3

According to some rough calculations, if you have a 20-page website that takes about 10 MB of storage space and your site gets 200 visitors per day, the monthly hosting bill with Amazon S3 should be around $5 per month.

Not exactly cheap but the site’s uptime will be close to 100% and it won’t crash even if you make it to the front page of CNN.com.

Also see: "How to Lower your Amazon S3 Bill"

Saturday, February 19, 2011

Merge and Split multiple PDF files


GIOS Merge and Split PDF application is an advanced Windows software which allows you to merge and split pdf or any scanned documents  ( Images ) without any limitation.  This is an open source software which works flawlessly without any high memory footprint.

Features :
  • Split / Merge multiple PDF files.
  • Supports creation of projects which can be used again and again,
  • No limitations.
  • Control on how many pages in a pdf file you need or just give the page numbers.
  • Supports Page range.
  • Preview the output.
  • Create PDF file from scanned document.
  • Command line version available.

Free tool for Split & Merge files

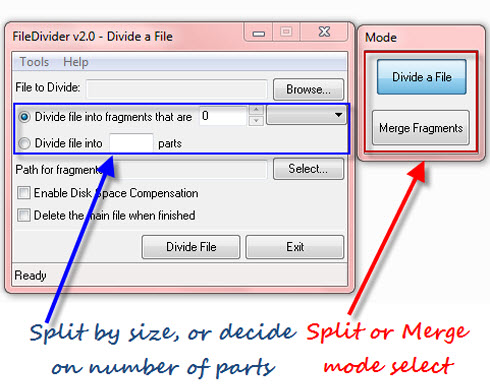
There are times when you want to split large file to smaller parts, so that you can easily send them across via email, or maybe you have two 1Gb flash drives and you want to carry a file of 1.5Gb. so, for such scenarios here is a free tool, named as FileDivider. FileDivider doesn’t only split a large file into fragments (you can decide size of fragments or you can simply choose on number of parts to be generated), also you can merge them back to get the original file.

The working of FileDivider can be explained in following steps -
Split a File

  • Launch the application, and browse for the file to be divided.
  • Choose the splitting mode, i.e. either decide to create parts of any specific size, or simply select the number of parts to be generated.
  • Select the output folder, and click on the ‘Divide’ button.
Merge Parts to get original file – 


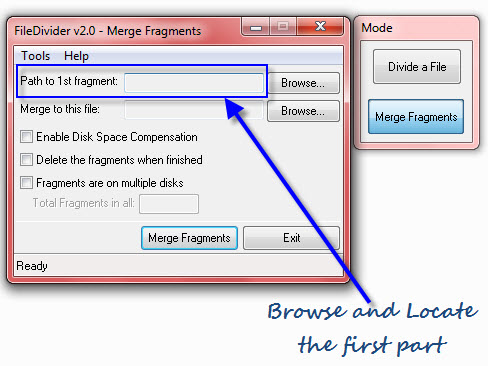
  • Now if you want to merge them back, choose the ‘Merge’ mode, and browse the first part of the file.
  • Select the output folder and click on merge.
There are couples of other features of this program, like you can merge files even if they are on different locations, there is also a Disk Space Compensation (DSC) feature which allows you to divide files or merge fragments even if you have no disk space available.
FileDivider works great, and definitely is a must have tool for handling large files.
Download FileDivider
Here is another application which can Split and Merge files, GIOS works great to Merge and Split multiple PDF files.

BroadCast Your Blogs on YouTube To Increase Traffic Significantly!


YouTube is is the most valuable source when it comes to driving traffic to a weblog or website. Most people often waste precious money on adwords and other Traffic driving services when the most cheapest and easiest source of traffic lies secretly in growing social websites. An example of one such free traffic generating source is no doubt YouTube. If you have observed the search results on Google carefully then you might have noticed that no matter what you search for, Google often displays results from two major sources i,e Wikipedia andYouTube. There is indeed a great advantage for those who wish to significantly increase there website traffic and today I will share one important trick of driving continuous and targeted Traffic from this Giant video Broadcasting service i.e YouTube

How Can You Drive Huge Flow Of Traffic From YouTube?

The Answer is simple, start broadcasting your Blog Posts on YouTube! Yes you heard it right! Let me explain it now.
Last year I tried every possible Traffic resource in order to multiply the number of unique visitors to MBT but most methods were often hectic and required great deal of time. I am sure you have triedlinkreferral or EntreCard and you know how often do we get angry when after having worked so hard the Traffic that we receive from them appears insufficient and non-targeted (Irrelevant visitors) So then I started experimented with some sources which worked wonders and one of these Magic wands was YouTube. What I did was creating videos of every post that I would publish. I did not create more than 8 videos but the Traffic from them was and is plausible. If I had kept on recording more and more videos then I am sure the Traffic that I receive today would have been thrice with no exaggeration. But due to lack of time I often fail to achieve many great opportunities..
I will share some easy steps by applying which you will be able to make a video of all your blog posts within 1-2 minutes. First kindly see the sample video below as an example,

You might have observed that I simply added a background music and then started simple recording of the post. We really don’t need high quality videos for this purpose as we just want the viewer to visit our blog after having seen the video so keeping the video short and straight is what we aim for.

How To create Videos of Blog Posts and Share it on YouTube?

The method is simple. Kindly do the following,
  1. Download CamStudio Video Recorder From camstudio.org
  2. Install CamStudio
  3. Then view the video below to know how to adjust your camStudio settings for quality recording.
 
4. After having understood the proper use of CamStudio simply jump at your Blog post and start Recording. Your Purpose is to provide the viewer with quick answer to his problem so keep the video short with following points in mind,
  • Start recording from your Blog header and then move to Post title and then move slowly till the end of your post.
  • Turn on your media player at the background while recording. This will make the video interesting.
  • After you have reached the end of your post then display a short ending message to the viewer as shown below,
Note:- You can use our image. Simply right Click it and click “Save Image as”

See the video below
5. Now Upload your video to YouTube using your Google Account
6. Keep the Video Title as your Post title
7. Add your Post link to the description and then finally hit Save.
8. View your video to see if it is working fine.


Move your Files to Relevant Folders with Ease-Desktop Management


You’re pretty organized in your real life but your computer desktop is a complete mess of files because you have the habit of saving everything on your desktop first.

The pictures that you transferred from the digital camera, your email attachments, documents, program installers, etc. are just scattered on your desktop and you rarely get the time to organize them into relevant folders.

How to Keep your Desktop Tidy

Would you therefore like to have some sort of a “wand” that can bring order to your desktop without much effort? Enter DropIt, a free Windows only utility that can automatically sort and organize your files based on your own rules.

DropIt adds a tiny “drop” icon to your desktop and any files or folders that you drag to this icon are automatically sent to the right folder according to pre-defined rules. And you don’t have to be a geek to create such rules.

For instance, you may set up a simple rule saying that all the PDFs and Word documents (*.doc;*.docx;*.pdf) should go to the My Documents folder while the MP3s and Videos (*.mp3;*.mp4;*.wmv) be moved to the Media folder.


DropIt is handy not just for tidying up your desktop but for organizing files in any of the other folders on your hard drive. It can both move as well as copy files from one folder to another or you may set the transfer mode as ‘compressed’ in which case the files will be zipped before getting moved to the destination.

You can even combine DropIt with the very powerful desktop search in Windows to organize files on your computer. For instance, find all the PDFs with desktop search and dump them to an appropriate folder by dragging them all to DropIt.

Once you have a tidy desktop, get this wallpaper to organize the remaining application icons in an easy-to-find layout. Also, if you are only looking to organize your desktop files into logical groups but without moving them to other folders, check out the Fences utility.

Friday, February 18, 2011

Switch to the Old Layout of Facebook Photos

Facebook recently upgraded the site's photo viewer such that pictures and associated user comments now appear in a dark pop-up window. This new layout of photos is live for most Facebook users though it looks a bit ugly and doesn't seem to gel with the otherwise very-elegant design of Facebook.com website.


Switch to the Old Layout of Facebook Photos


If you are viewing a photo in Facebook and would like to switch to the classic layout - where photos are displayed without a pop-up - just press the F5 key on your keyboard.

This will refresh the current Facebook page and the photo will display on its own page without the lightbox effect. Watch the above screencast for details.

All in One Notification Area Tray helps you managing lot of open windows

Even though Windows 7 comes with grouping of open windows there are users who always have a lot of open windows even if it is not by choice. This leads to problem of clarity and ultimately you run out of space on your taskbar.
All in One Tray is a simple utility which solves this problem by acting as a placeholder for any open window ( press Win + Q ) you want to send to background and use it later. This application itself sits in the Tray Bar. Now if you are worried about cluttered Tray Bar, don’t be. Like I said it acts as placeholder meaning it does not send windows to Tray Bar but hides them inside itself which can be accessed when you do a right-click on that icon.

Another feature which makes this app stand out is integration of control menu items

  • Admin Controls, Network configuration etc all in categorized.
  • System tools such as IP release, Renew IP, Power Options
  • and one click access to Built in tools like Problem Step Recorder etc.
  • It also lets you add your own set of tools by using the User Custom Path where you can select an exe. However this is limited to four.

Here is a video demo from the developer : ( direct link )

Download All in One Tray

Search This Blog