Links

Showing posts with label MICROSOFT. Show all posts

Tuesday, October 12, 2010

Windows Defender Error Code 0×800106ba in Windows 7 or Vista

Troubleshoot Windows Defender Error Code 0×800106ba
Formerly known as Microsoft Antispyware, the software giant released Windows Defender in 2006 to protect its number one operating system at the time, Windows XP, from spyware. Simple to use and supported in Windows Vista and 7, Windows Defender is well-known for its reliability and stability.
Unfortunately, Windows Defender does occasionally become corrupted and must be removed and reinstalled to work properly. The Windows Error Code 0×800106ba is usually accompanied with one of the following generic error messages:
Error Code 0×800106ba Application failed to initialize
Error Code 0×800106ba The systems license has expired. Your login request is denied
Whichever error you receive, there are two fixes you can try to get Windows Defender back up and running on your Windows XP, Vista, or 7 computer.
Before you try any of the fixes below, there is one caveat. Some third-party applications such as Norton AntiVirus don’t work well when Windows Defender is running. This is because these applications have their own antispyware application running. Having two applications that protect you from the same malware is inadvisable.
If your current malware protection software is already protecting you from spyware, you should permanently disable Windows Defender if the third-party application hasn’t done so already or if you or some other user of the computer restarted Windows Defender as a service that runs at Windows startup.

Manually Restart Windows Defender

Sometimes Windows Defender has trouble initializing at Windows startup. To manually start Windows Defender, begin by logging into Windows with an account that has administrative privileges. Click on Start>All Programs>Administrative Tools>Services.
You should now be looking at the Services window. In the right hand pane, locate the service titled Windows Defender. The services in the window are listed alphabetically so you will have no problem locating the Windows Defender service among the many services listed. Right click on Windows Defender and click on Properties.
Click the General tab and set the Startup type to Automatic (Delayed Start). This will instruct Windows to delay the startup of Windows Defender until other services and applications have finished loading.
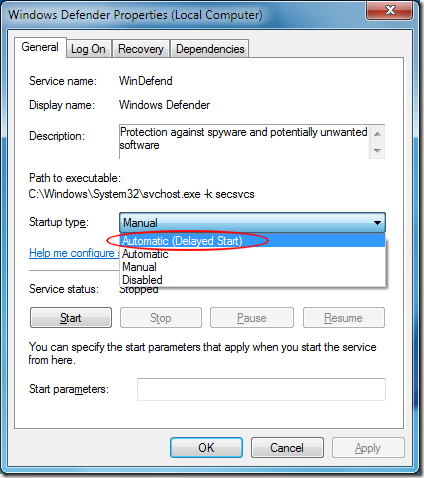
Click OK and restart your computer. If you still receive the 0×800106ba error message, you should try uninstalling and reinstalling Windows Defender.

Uninstall and Reinstall Windows Defender

To uninstall Windows Defender, click on Start and then Run. If you don’t have the Run command on your Start Menu, hold down the Windows key on your keyboard and press the R key. Either method brings up the Run dialog box. Type appwiz.cpl in the Run box and click OK.
Locate the Windows Defender entry in the list of applications and click the Uninstallbutton at the top of the list. Follow the instructions to complete the Windows Defender un-installation.
When finished, restart your computer and one again log in using an account that has administrative privileges. To reinstall Windows Defender, visit the official Windows Defender website, click on the Get It Now button, and follow the instructions.

Saturday, October 9, 2010

How to Enable or Disable Windows 7 System Restore Configuration

information   Information
This will show you how to enable or disable System Restore configuration through System Protection for all users in Windows 7. This is used to configure restore settingsmanage disk space, and delete restore points.

When disable, the Configure button is grayed out in the System Protection tab in System Properties. Users will also not be able to change any of the System Restore configuration settings that were set before it was disabled.

EXAMPLE: System Restore Configuration Enabled and Disabled
OPTION ONE

Through a REG File Download
1. To Enable System Restore Configuration -
A) Click on the Download button below to download the
Enable_System_Restore_Configuration.reg file below. 
download
B) Go to step 3.
2. To Disable System Restore Configuration -
A) Click on the Download button below to download the
Disable_System_Restore_Configuration.reg file below.
download
3. Click on Save, and save the .reg file to the desktop.

4. Right click the downloaded .reg file on the Desktop and click on Merge.

5. Click on RunYesYes, and OK when prompted.

6. When done, you can delete the downloaded .reg file on the desktop if you like.


OPTION TWO

Through the Local Group Policy Editor
1. Open the Local Group Policy Editor.
2. In the left pane, click on to expand Computer ConfigurationAdministrative TemplatesSystem, and System Restore. (see screenshot below)
3. In the right pane, right click on Turn off configuration and click on Edit. (see screenshot above)

4. To Enable System Restore Configuration -
A) Select (dot) either Not Configured or Disabled. (see screenshot below step 6)
B) Go to step 6.
5. To Disable System Restore Configuration -
A) Select (dot) Enabled. (see screenshot below step 6)
6. Click on OK. (see screenshot below)
7. Close the Local Group Policy Editor window.
That's it,

Tuesday, September 14, 2010

Windows Vista Install Guide Page 5

21) PC Performance:

Vista now checks the system performance to automaticlly configure a few options. This may take several minutes while the system does this and it will only do it this one time.


22) Login:

We are finally greeted with the login screen, however, there is still more configuration to come.
Enter in your password that you used previously during the install process and hit ENTER or the little blue arrow to login.


23) Desktop Setup:

Your account profile starts being created here starting with your personal desktop configuration. More happens on the next screen. This process will also take several minutes, but only happen once.


24) Account Profile:

Vista now sets up profile configurations for Internet Explorer, Windows Media Player as well as a few more Windows applications. This could take several more minutes but we are almost there!


25) Welcome Screen:

Vista is installed!
On this screen, we are presented with our system configuration as well as several different options.
I hope you enjoyed this install guide and I thank you for reading!


Windows Vista Install Guide Page 4

16) PC Name:

Here is where we can name the system for networking purposes. By default, it uses the account name entered in the previous step and adds "-PC" to it. We can also select a background for the desktop.
After making your selection, select the Next button.


17) Updates:

Here we can configure Windows Update with several options. I suggest "Use recommended options" or the top option for most PC users.


18) Time Settings:

Here is where you can set the time and daylight savings time options.
After configuring your time zone, clock settings and date, select the Next button.


19) Network Configuration:

Vista now asks our network configuration by asking "Home, Work or Public Place."
Descriptions are expanded on screen so I will no go into them here.
Make your selection to continue to the next screen.


20) Thanks!:

On this screen, we are thanked by Bill G. for installing Windows Vista.
After you are done being thanked, select the Next button.


Windows Vista Install Guide Page 3

11) Installing...:

Here is where Vista installs major components of the OS. This process can take 10 to 60 minutes depending on the system.


12) Reboot:

Here we see the system needing to reboot to continue installation tasks.
You can hit the Restart Now button or just allow the reboot to happen automatically after several seconds.


13) First Time:

Here we see a "..." progress as Vista tries to start for the first time. This process may take several minutes before going to the next screen.


14) Completing Installation:

Vista continues to install at this screen. Depending on system, another reboot or two may happen before the next screen is displayed.


15) Account Creation:

Here is where we create the first user account for the system and select an icon to be displayed on the login screen. Ensure you password your account.
After finishing entering your information and icon selection, select the Next button.


Windows Vista Install Guide Page 2

6) Product Key:

This screen is where you enter your product key or "CD Key" as it is sometimes called.
An option also exists to automatically activate Vista upon first coming online. I uncheck this box to ensure everything is running smoothly before activating and having issues later on. 30 days is the standard amount of time before activation is required, though some products (such as MSDN subscriptions) have 60 days or more.
After entering your product key, press the Next button.


7) License Agreement: 

Here we see the License Agreement you must accept before continuing.
After reading the agreement, check the box next to "I accept the license terms".


8) Option Selections:

Here we would be able to choose an "Upgrade" install (if running setup from a previous version of Windows, such as XP) or a "Custom" (clean) install.
Select the whole box containing "Custom (advanced)" to continue to the next screen.


9) Hard Drives:

This is where you can select which hard drive/partition to install Vista on. Since this system only has one hard drive, only one place Vista can go. Advanced options are shown in the next screen shot.
This is also where you would install drivers for your ACPI/RAID/SATA controller by using the "Load Driver" option. After the installation of the ACPI/RAID/SATA drivers, your hard drives should appear as shown on the right.
If no additional drivers are needed, select the Next button.


10) Advanced Options:

The advanced options allow creation of multiple partitions and the option of formatting existing partitions.
After finishing your particular partition configuration that you desire, select the Next button.


Monday, September 13, 2010

Windows Vista Install Guide Page 1

Introduction
After many requests for this information posted on various forums, I have drafted this general guide to help.Take note: Regardless of flavor of Vista you will be installing, the steps listed here are the same. The only difference would be which product key is entered to determine which flavor of Vista is installed.

Important Information
This guide assumes a "clean" installation and not an "upgrade" from a previous OS. Ensure that you backup all of your important files (documents, music, etc) to CD/DVD/another hard drive before following these steps.

If you are using Hard Disks in a RAID or ACPI setup, you will first need to download the latest Vista compatible (32-bit or 64-bit) for your particular hardware before installing clean. Check with your chipset/hard drive controllers manufactures web site for the latest drivers/information before starting.

1) Shall we begin?

After configuring the system for booting from a CD/DVD, the Windows Setup screen appears.
At this point, Setup is loading the driver files it needs to continue with installation.


2) Progress Bar:

The next screen is a more graphical progress bar indicating Windows Vista is still working in the background.


3) Option Selections: 

The first options you will come across are selections for Language, Time and currency format, and Keyboard layout.
Make your selections by using the pull down menus and press the Next button.


4) Install Now: 

Here we have the option of repairing a previous installation or "Install Now."
Highlight the "Install Now" button to continue to the next screen.


5) Please Wait: 

Windows Vista is working in the background. This may take several minutes depending on the system.


Previous Page ~ Next Page


Tuesday, September 7, 2010

Hidden Programs In Windows Xp

Hidden Programs In Windows Xp


1- Private Character Editor
This program is for designing icons and Characters(Alphapet)
Click :start
Then :run
type :EUDCEDIT
.................................................................................................................................................

2- iExpress
This Program is for converting your files to EXCUTABLE files
Click : start
Then : run
type : iexpress
.................................................................................................................................................

3-Disk Cleanup
This program used for cleaning harddisk to offer space
Click : start
Then : run
type : cleanmgr
.................................................................................................................................................

4-Dr Watson
This program Is for repairing problems in Windows
Click : start
Then : run
type : drwtsn32
.................................................................................................................................................

5-Windows Media Player 5.1
Opens the old media player
Click : start
Then : run
type : mplay32
.................................................................................................................................................

Program ............. CODE
__________ __________

Character Map = charmap

DirectX diagnosis = dxdiag

Object Packager = packager

System Monitor = perfmon

Program Manager = progman

Remote Access phone book = rasphone 

Registry Editor = regedt32

File siganture verification tool = sigverif

Volume Contro = sndvol32

System Configuration Editor = sysedit

Syskey = syskey

Microsoft Telnet Client = telnet

Search This Blog