You could use the standard windows functionality using the Shift+PrtSc keys to capture your screen.and than start pasting and cutting away in you Graphics Program..  But what if there was an easy way to just take that part of the screen you want? Choose and Capture your own selections There is a much easier way to just select the part of the screen you want, save it in a .jpg or other file format and save it with the name you provide. A program that just needs you to hit the "PrtSc" key to show a different mouse cursor and lets you select the part of the screen you need to capture. It then shows you what you selected part of the scree and asks you where to save the image and how you want to name the file. And you want if for Free.... Here it is.... Gadwin Printscreen download it via the page and install the program. Then Run it and set you preferences accordingly ot your needs.  My favorites settings are slightly different form the one in the screen. Configuration for Optimal use Preferences You might want to have the program running in the background so you can use it right away, so you have to set the option "Run at Windows startup". Disable the Splah, you don't need a reminder that its running... SourceIn the Source settings select the "Rectangler Area" option As an option you might want to have the Mouse Cursor show in the screen to point to a special section, but if you don't want that, disable it here. I always leave it on, and move the mouse out of the capture section of the scree. Destination This is where you set the standard location for you Screenshot images. And where you can set some options on where the capture should be send, like to the Clipboard, to a Printer, to E-mail and/or to File... If you need to take a lot of screenshots after another, you might use the automatic nummer assingment option. Image The only option you should use is the File type.. please change this from BMP to JPG, otherwise you have very large files, and you don't want that.. Why take screenshots? Most of the time you can use screenshots to write show the images in articles you write, for a report or even a website  But you can now easily take a snapshot of that erro you get and send it to you helpdesk. You can really save a lot of time with this tool if you are writing a manual for a webtsite maintenance handbook, or a software program. Well, I guess you have some idea's of you own on how you want to use it. So go ahead and Download Gadwin Printscreen Utility |
Monday, October 18, 2010
Simplest method to Capture a Screen Shot
Wednesday, October 13, 2010
How to prevent registry changes in Windows Vista
Security has always been one of Microsoft’s favorite marketing buzzwords, and never more so than when Windows Vista was introduced. But as it turns out, Vista’s security features are quite a bit more useful for protecting
your PC from itself than from any alleged intruders.
your PC from itself than from any alleged intruders.
You can lock a registry key to prevent employees from installing software on a company PC, or prevent kids from disabling parental controls on a family PC.
Permissions also let you lock file type associations, preventing other applications from changing them. And by locking certain other keys, you can help protect your PC from viruses and spyware.

Here’s how you do it in Vista and windows 7:
- Open the Registry Editor, under the control panel

Navigate to the key you want to protect. You can’t protect individual values, but rather only the keys that contain them. This means that if you lock a key to protect one of its values, none of its values can be modified. You can, however, choose whether or not your changes are made to the subkeys of the selected key.
Right-click the key, and select Permissions.

Choose a user that you want to deny/allow to change the registry. In the example below I chose “Users” then I checked the Deny Full Control and Read permissions:

When you’re done, click OK in each of the opened dialog windows to commit the change. The change will take effect immediately.
cd installer for one time installation only!!!
guys i have come across a cd which has a feature i never came across before.... not even heard of it. Its the Billing System Software cd which our org is using and the unique thing about it is only one time installation. well i heard of all kind of copy protections and restrictions imposed by the software devlopers on the cd to avoid making the copies of it but this kind of protection is something which i never thought before.
Question:
can someone throw light on it how it is achieved and is it possible for us to make a similar kind of cd.
My biggest doubt is that how does the optical disk know that i have been used for installation once and my life is over.The cd when opened thereafter,the contents are accessible but the installer cannot be opened.
The cd is not Copy protected , i checked it using clone xl and clone cd.
However i made an image using the clone cd but the behavior of the both the cds were same.
On inserting the cd one can explore the cd and view the files but when click on installer it won't execute.
The installer exe has become like a ms-dos file and nothing happens on clicking. So i think the changes take place in the installer itself.
suppose .. i'm using a CD-ROM, not a CD R/W.. how could it be possible that the installer file has been changed directly? If you use a R/W, then we can say that, they made the installer file such a way, when it got installed it will be re-writted by the hidden commands [we can burn a cd directly using XP].
Answer:
yes. these type of copy protected cds exists
actually the die layer of the cd-r has a point at a distance say where the end file of installer is stored..
which breaks as soon it is read..
and the cd is unusable
confusing???????????????
LET ME CLARIFY
See guys !!!!!!!!! have you work on microsoft office 97
i have original cd of microsoft windows 97...........
the property of this cd was its installer or setup runs only once in any computer .. after that the matter was left on cd
but cd refuses to run installer
but you can view files..
also if you have install minimal or custom install then you can make full install later on or install component of your choice
but the full installer wud not work again
if you take it to other pc or format your harddrive then also it will not work
if you copy the contents to other cd then that cd will also behave in same manner and will give you error"installer will not run"
if you copy the contents to your harddisk & then run setup then also you will get the same error & installer will not work..
so this was the sceneario
ACTUALLY this was done by a combination of copy-protection techniques at both hardware level as well as software level......
THE HARDWARE LEVEL PROTECTION
guys did u hear of rental cds and dvds whose life are only 3 days after being opened
these were movie cds which were given on rent and u have not to visit shop again to return them . also there is no jhanjhat of depositing security
just take it on rent , watch it & throw it in dustbin or use as item in showcase
so here the same story
there is a small invisible block in cd which is made of special dye which is different from the dye which is on rest of cd..
the property of this special dye is that whenever a laser beam falls on it
it get melt and the data stored in particular block is lost
the data in the block is generally the end point of installer
so when you install a software from such cd
then when you come to the end of installer
the laser beam from cd-rom falls on that block
and the disc knows that she has been used before
there is no registry
as if there was registry involved then why disc does not run on other or newly freshed pc
no matter is written on disc
because we use it in cd-rom
AT SOFTWARE LEVEL
at software level installer checks that the software is already installed or not. if it is already installed with the same key then you can use the cd for custom install & update..
if software is not already installed(checks in registry) then it starts the installer . which verifies some condition
which is true if SPECIAL BLOCK(disscussed above)==intact
then installer will run
is false if SPECIAL BLOCK==ruined
then installer will produce "error message"
and abort the installation.
if we make copy of cd then that wud also behave in same manner
because when we copy disc then all the contents are copied as it is
if the SPECIAL BLOCK has already ruined or destroyed
then it will be copied in destroyed form on harddisk or on copied cd
that's why u will not be able to run the setup from there
Que..
if we copy a fresh disc whose SPECIAL BLOCK has not been destroyed
then the copied cd will work perfectly or not?
I am not sure. i have not tried it .
YES , acc. to logic they should work in normal way & bypassing the copy-protection
may pirates have work same way to produce pirated cds of office97
few years back
and this may be the reason of failure of such copy-protection technique
this technique was also discouraged due to liscensing problems
when you purchase a software you purchase rights to install it in one particular comp..for lifetime
if you change operating system or do a fresh install then you have no option other than to go & buy another copy of software
also in case if you purchase new comp.
or upgrade ur pc major components like mobo , processor
then u have to install os again.......
such copy-protected cd will then put you in fix
i hope your querries have been cleared
if you have doubts then post here
Tuesday, October 12, 2010
Windows Defender Error Code 0×800106ba in Windows 7 or Vista
Troubleshoot Windows Defender Error Code 0×800106ba


Formerly known as Microsoft Antispyware, the software giant released Windows Defender in 2006 to protect its number one operating system at the time, Windows XP, from spyware. Simple to use and supported in Windows Vista and 7, Windows Defender is well-known for its reliability and stability.
Unfortunately, Windows Defender does occasionally become corrupted and must be removed and reinstalled to work properly. The Windows Error Code 0×800106ba is usually accompanied with one of the following generic error messages:
Error Code 0×800106ba Application failed to initialize
Error Code 0×800106ba The systems license has expired. Your login request is denied
Whichever error you receive, there are two fixes you can try to get Windows Defender back up and running on your Windows XP, Vista, or 7 computer.
Before you try any of the fixes below, there is one caveat. Some third-party applications such as Norton AntiVirus don’t work well when Windows Defender is running. This is because these applications have their own antispyware application running. Having two applications that protect you from the same malware is inadvisable.
If your current malware protection software is already protecting you from spyware, you should permanently disable Windows Defender if the third-party application hasn’t done so already or if you or some other user of the computer restarted Windows Defender as a service that runs at Windows startup.
Manually Restart Windows Defender
Sometimes Windows Defender has trouble initializing at Windows startup. To manually start Windows Defender, begin by logging into Windows with an account that has administrative privileges. Click on Start>All Programs>Administrative Tools>Services.
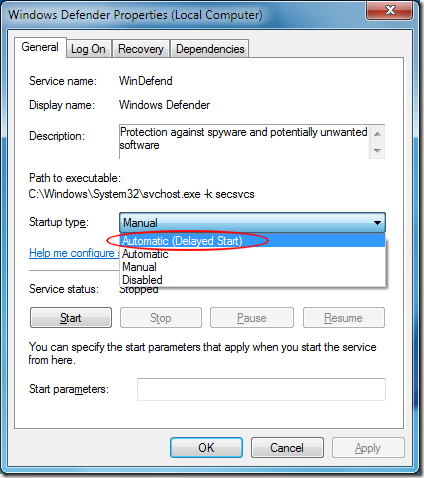
You should now be looking at the Services window. In the right hand pane, locate the service titled Windows Defender. The services in the window are listed alphabetically so you will have no problem locating the Windows Defender service among the many services listed. Right click on Windows Defender and click on Properties.
Click the General tab and set the Startup type to Automatic (Delayed Start). This will instruct Windows to delay the startup of Windows Defender until other services and applications have finished loading.
Click OK and restart your computer. If you still receive the 0×800106ba error message, you should try uninstalling and reinstalling Windows Defender.
Uninstall and Reinstall Windows Defender
To uninstall Windows Defender, click on Start and then Run. If you don’t have the Run command on your Start Menu, hold down the Windows key on your keyboard and press the R key. Either method brings up the Run dialog box. Type appwiz.cpl in the Run box and click OK.
Locate the Windows Defender entry in the list of applications and click the Uninstallbutton at the top of the list. Follow the instructions to complete the Windows Defender un-installation.
When finished, restart your computer and one again log in using an account that has administrative privileges. To reinstall Windows Defender, visit the official Windows Defender website, click on the Get It Now button, and follow the instructions.
Monday, October 11, 2010
Disable Automatic Reboot During System Crash
In Windows 7 and Windows XP, the default behavior of the operating system after a system crash or blue screen is to simply restart. Sometimes an automatic reboot can fix the problem and you don’t have to worry about the actual error.
However, most of the time once your system crashes or if you get a blue screen, it will not be a one time event. If there is some software or hardware problem with your computer, your system might crash often or you might get more BSOD’s.
In this case, it’s good to be able to actually see what the error message is that caused the crash. You can do this in two ways, either via the System properties or by editing the registry.
Windows 7, XP – Disable Automatic Reboot during Crash/Blue Screen
In Windows 7, you can turn off the automatic restart after a system crash by going to System properties. Right-click on My Computer and choose Properties. Note that the procedure for Windows XP is nearly identical.

Now click on Advanced System Settings on the left hand menu.

Click on the Advanced tab and then click on Settings under Startup and Recovery.

Finally, go ahead and uncheck the Automatically restart box under the System failureheading.

Click OK and close all the previous windows. Now when a system error or crash occurs, you will be able to see the entire message instead of it just flickering on the screen for half a second.
Disable Automatic Restart via Registry
Note that you can also disable this option via a registry key, so it could be scripted and run on many computers at once.
Navigate to the following registry key listed below:
HKEY_LOCAL_MACHINE\SYSTEM\CurrentControlSet\Control\CrashControl
Now find a key called AutoReboot. A value of 1 means that automatic restart is enabled and a value of 0 means it is disabled.

That’s pretty much it! This is a very useful feature that will give you a lot more time to review the error that caused a system crash or failure. If the error message flashes and then disappears, it’s because automatic restart is set. Enjoy!
Windows Hangs during Shutdown?
Does Windows hang when you try to shut it down? On one of my laptops, I ran into the problem where Windows would just hang while saying
Windows is Shutting Down
Sometimes it would eventually shut down, but it could take anywhere from 4 minutes to 10! The laptop is brand new and was running Windows 7, so there were no problems with the specs.
After playing around with several solutions, I was able to get rid of the annoying shutdown problem! In this post, I’ll go through the various solutions I tried and hopefully one will work for you.
Method 1 – Reinstall Network Drivers
For some strange reason, network drivers can really cause a lot of problems during shutdown. Windows tries to send certain commands to your network card to kill off network connections and if there is any problem with that communication, you can experience a very long shutdown period.
Go ahead and download the latest network drivers and install them. Restart your computer (might have to kill the power the first time) and see if it still hangs during shutdown.
Method 2 – Remove Hardware
Another reason why a shutdown can take forever is if there is some new hardware that has been installed on the computer.
If you recently installed any hardware, disable it in Device Manager and see if that solves your problem. If so, you might have to update the drivers for that piece of hardware. Also, make sure to disconnect any USB device from your computer such as USB sticks and external hard drives.
Method 3 – Uninstall Software
Another way to fix this issue is to open Task Manager and kill off some processes and then try to restart. If it’s a software program running in the background that is causing the issue, the computer will shutdown immediately.
I noticed this was a problem on computers that had anti-virus and battery backup (UPS) software installed at the same time. The two would conflict with each other during shutdown and prevent the computer from turning off.
You can try disabling anti-virus program or security software first as these tend to hang and cause issues during shutdown.
You can also disable programs from starting up altogether by going to Startup in MSCONFIG. Disable as many services (other than Microsoft ones) and startup programs as possible and try to shutdown.
Note that the slow shutdown can also be caused by Windows services like Terminal Services or graphics card services. You can disable services by using MSCONFIG or by typing services.msc into CMD.
Method 4 – Paging File Setting
Some users could have a problem in which the page file is set to be cleared during every shutdown of the computer. This is sometimes done for security reasons, but most users would never need this feature.
It can, however, be turned on by certain security software. You can disable it by going to Start, Run, typing GPEDIT.MSC and clicking ok.
Then go to Computer Configuration, Windows Settings, Security Settings, Local Policies, Security Options and find Shutdown: Clear virtual memory pagefile. Make sure it is disabled.

Method 4 – Logoff Scripts
If you are in a domain environment, a slow shutdown could be caused by logoff scripts that are enforced on your PC. And it could actually be a problem when you are not connected to your office network.
In these cases, the computer is searching for the corporate network, but can’t find the logoff scripts and then times out after a certain amount of time. You can ask your network administrator if you think that is the reason for your slow shutdown.
If you’re still having shutdown problems in Windows 7, Vista, or XP, post a comment here with specific details and we will try to help!
How to remove Shortcut virus in your pen drive?????
There are many names for this virus but the most common
is "the shortcut virus". Its capable of "disappearing" our
folder and "appearing" it into shortcut.
The first thing NOT to do is to FORMAT your flash drive.
Rumors says that this virus is just a prank..
So that unwise user will think they files all gone!
Your file is NOT gone or corrupted, its just HIDDEN.
Follow these steps (if you are using windows..):
1) open your infected drive directory (example: drive F:\)
2) open tool, folder option, view tab
3) click "show hidden files & folders"
4) UNCLICK both "Hide extension for known file type" and
"Hide protected operating system files (recommended)"
5) If there is a warning, just click yes
/* Now you should be able to see your lost file (its in transparent
folder)*/
6) Enter the hidden folder, CUT all your file and PASTE it inside a new
folder. (repeat this step for your other folder too)
7) Delete all old folders that is empty and also the annoying 1kB shortcut
folder. (also any suspicious folder or icon such as desktop.ini, thumb.db
etc that might be virus)
Sunday, October 10, 2010
Free Microsoft Word password / Microsoft Excel password recovery software
Forgotten your Microsoft Word password or Microsoft Excel password and can't open your file? Try Free Word / Excel Password Recovery Wizard before spending any money on commercial software.
Free Word / Excel Password Recovery Wizard offers the same functionality and performance as expensive commercial Word password / Excel password software, but is a completely free download. Unlike other supposedly "free" downloads, it is a full product, not a demo version or shareware. It contains no spyware or other malware.
| Download Free Word / Excel Password Recovery wizard Welcome to the downloads page. You can get the latest version of the Free Word / Excel Password Recovery Wizard from this page, as well as download required Windows components that you may not have. This software is freeware, not a trial version or shareware. This is the full version of the software. Downloading and use of the Free Word / Excel password recovery wizard is subject to the license agreement (which can be viewed here). Download Free Word / Excel password recovery wizard now (237KB) This product requires you to have the Windows installer and .NET framework installed on your PC. If you are running Windows XP, this will probably already have everything you need, if not, you may need to download the following components. Download Windows installer (InstMsiA.exe) - not required for Windows 2000 or later (1668KB) Download Windows installer (InstMsiW.exe) - not required for Windows 2000 or later (1779KB) Download the Windows .NET framework - only required if not already installed To install this software, extract all the files from the WinZip archive to your hard drive, then double click on the file called FreeWordExcelPasswordWizard.msi (204Kb). Don't double click on the Setup.exe file as this is used by the installer, and will simply display an error message (in Italian). A standard English dictionary is bundled with the installation and is installed in the program directory (by default C:\Program Files\www.freewordexcelpassword.com\Free Word Excel Password Wizard\dictionary.txt). A larger commercial dictionary is available here. Screenshots Here are some screenshots showing the program. You can see how easy Free Word / Excel Password Recovery is to use, with helpful instructions on each page that guide you through the password recovery.    |
Saturday, October 9, 2010
Cannot see other computers on network in My Network Places?
When you go to My Network Places on XP, is it blank or empty? Even if you are connected to the network, you may still not be able to see other computers on the same network for several reasons.
Firstly, you need to determine what kind of network you are on, i.e. a workgroup or a domain. If you are in a domain and you cannot see any other computer in My Network Places, it could be because DNS is not setup properly.
In this article, I will walk through several settings and configurations you can check that would commonly cause My Network Places to be empty.
File and Printer Sharing is turned off
If File and Printer Sharing is not turned on, you will never see another computer across the network. This protocol must be installed in order to be able browse for it from My Network Places.
To enable File and Printer Sharing, go to the Control Panel, then Network Connections, right-click on Local Area Connection, and choose Properties.

On the General tab, make sure the following protocols are installed and checked:
- Client for Microsoft Networks
- File and Printer Sharing for Microsoft Networks
- Internet Protocol (TCP/IP)

If it’s not there, click the Install button and add the above protocols to the list and restart your computer. If these are installed correctly, then move on to the next check.
All computers are in the same workgroup
The second thing that needs to happen in order for another computer on the network to show up in your My Network Places list is that all the computers have to be in the same workgroup or domain.
You can check this by right-clicking on My Computer, choosing Properties, and clicking on the Computer Name tab.

Next to Workgroup, you will see the workgroup name. Each computer on the network has to have exactly the same workgroup name in order to be able to see each other. You can click Change to change the name of the workgroup.
Allow File and Printer Sharing in Windows/3rd party Firewall
Once you have enabled File and Printer Sharing, you still may not be able to see other computers on the network if you have the Windows XP Firewall enabled.
By default, Windows does not allow the File and Printer Sharing service access through the firewall, so you have to manually allow access. You can do this by going to Control Panel, clicking on Windows Firewall and then clicking on the Exceptions tab.

Make sure to CHECK the box next to File and Printer Sharing. Now the service will be allowed access through the firewall and you will be able to see if in My Network Places.
Note that if you have other firewall or Internet security software installed, it can also prevent Windows Networking features to function properly. One prime example of this is Norton Internet Security. You have to tell it which subnet to allow through the firewall or you have to uninstall it.
Open ports on your router
Another source of headaches could be the firewall on your router. If you have a newer router, some of them automatically enable their own firewalls! So you have to log into your router and open the ports manually.
The File and Printer Sharing port numbers range between 135 and 139, so if you open those up on your router, it should be enough to see the other computers on the network. You can also try disabling the firewall to test whether it’s the router that is causing the problem.
Ping other computers on the network
One other simple thing to do is to check whether you can even ping the other computers on the network. If you can’t ping them, then that means that there is something wrong with the network connection itself.
You can ping another computer by going to Start, clicking on Run, and typing in CMD. In the command prompt, type in ping x.x.x.x or ping computername.

Switch between Static and DHCP IP address
Another way to try and solve this issue is to switch the computer over to a static IP address and then switch it back to DHCP. When you switch like that, the TCP/IP configuration is reset and any corrupted IP settings like the Subnet mask, etc are fixed.
You can do this by right-clicking on Local Area Connection, choosing Properties, and then selecting the Internet Protocol (TCP/IP) entry and choosing Properties.

Then click Use the following IP address and type in an IP address that would work on your current network. Also choose Use the following DNS server addresses and type in the IP address of your router.
Click OK and then OK again. After that, go back to that screen and choose Obtain and IP Address automatically for both and click OK.

This should hopefully fix any problems you are having with not being able to browse computers on your network. If this didn’t fix your problem, post a comment and I’ll try to help! Enjoy!
How to Enable or Disable Windows 7 System Restore Configuration
This will show you how to enable or disable System Restore configuration through System Protection for all users in Windows 7. This is used to configure restore settings, manage disk space, and delete restore points.
When disable, the Configure button is grayed out in the System Protection tab in System Properties. Users will also not be able to change any of the System Restore configuration settings that were set before it was disabled.
When disable, the Configure button is grayed out in the System Protection tab in System Properties. Users will also not be able to change any of the System Restore configuration settings that were set before it was disabled.
EXAMPLE: System Restore Configuration Enabled and Disabled
OPTION ONE


Through a REG File Download
1. To Enable System Restore Configuration -A) Click on the Download button below to download the
Enable_System_Restore_Configuration.reg file below.
2. To Disable System Restore Configuration -B) Go to step 3.A) Click on the Download button below to download the
Disable_System_Restore_Configuration.reg file below.3. Click on Save, and save the .reg file to the desktop.
4. Right click the downloaded .reg file on the Desktop and click on Merge.
5. Click on Run, Yes, Yes, and OK when prompted.
6. When done, you can delete the downloaded .reg file on the desktop if you like.

OPTION TWO
Through the Local Group Policy Editor
1. Open the Local Group Policy Editor.
2. In the left pane, click on to expand Computer Configuration, Administrative Templates, System, and System Restore. (see screenshot below)That's it,3. In the right pane, right click on Turn off configuration and click on Edit. (see screenshot above)
4. To Enable System Restore Configuration -A) Select (dot) either Not Configured or Disabled. (see screenshot below step 6)B) Go to step 6.5. To Disable System Restore Configuration -A) Select (dot) Enabled. (see screenshot below step 6)6. Click on OK. (see screenshot below)7. Close the Local Group Policy Editor window.


Subscribe to:
Posts (Atom)